How to manage user accounts and access permissions ?
If several people have to work in your Office Maker or BiblioMaker software, it is recommended to create an individual account for each user. This will allow you to limit the rights of certain users and to find out afterwards who has created or modified records.
By default, the program has a user named "Administrator". This user has all the rights and is the only one who can define the other user accounts.
You can access user management from Maintenance (accessible via the File>Maintenance menu), by calling the Maintenance>Configure Users menu command.
Click the Add button to create a new user account.
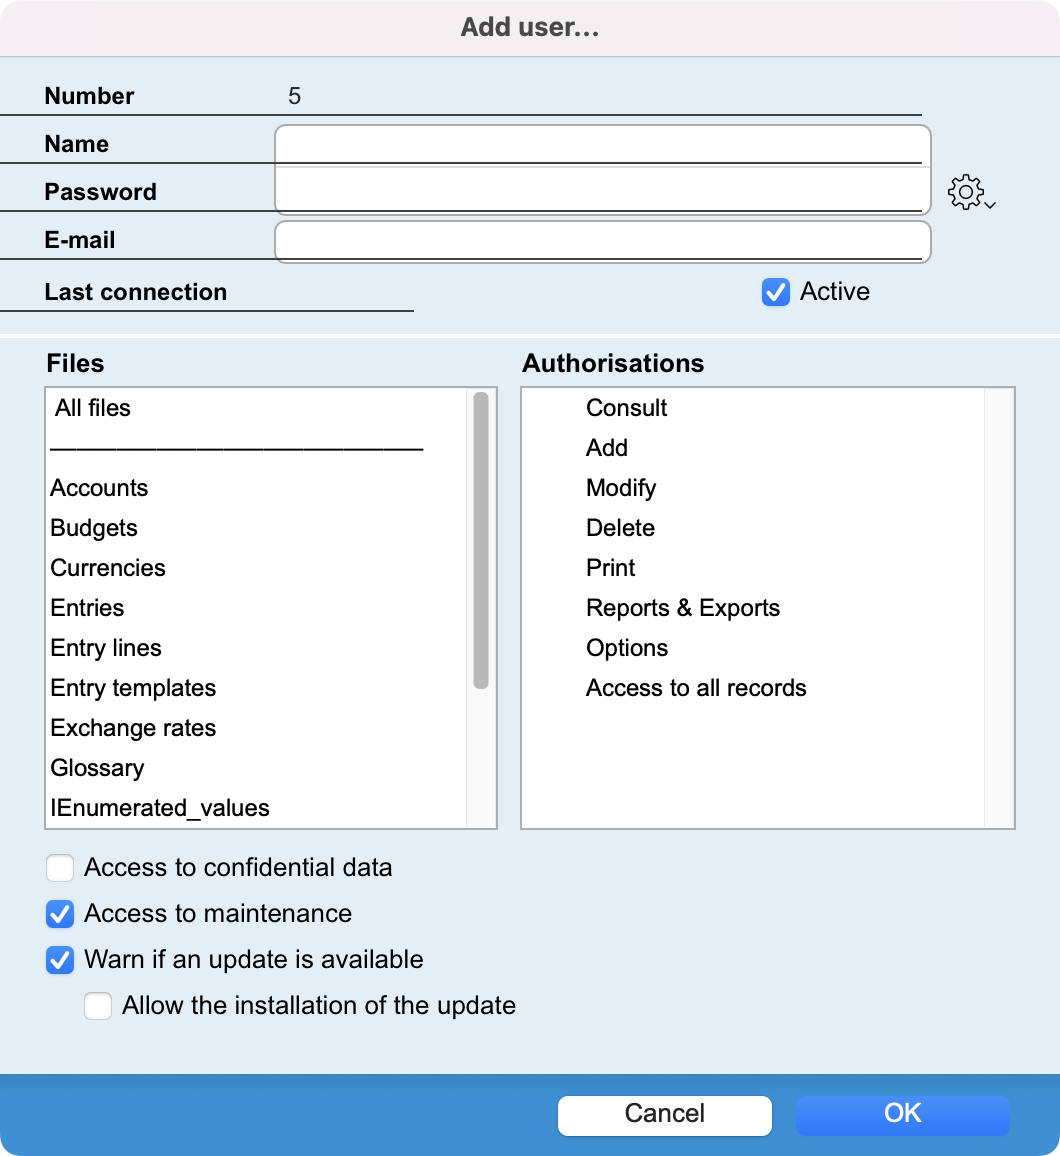 |
A user account consists of the following items:
Below these fields, two areas each contain a list for determining access permissions. The area on the left lists the files in the database. Click on one of the files and determine in the right-hand area what the account may do in the selected file. By default, the user has all permissions (marked with a check mark). Click on the check mark to remove the permission.
The Authorisations are :
At the bottom of the dialog, use the checkboxes to give or not give special permissions such as access to certain commands available in maintenance or information about the availability of updates. |
Attributes can also be globally defined for all the files. To do this click on All Files, then specify the attributes in the same way. It is possible that when you click on All Files some options are seen to have a question mark in front of them. This means that some files have the relevant options and others not.
If a user is not authorized to access a file, it will not appear in the Data or other menus. For example, if in the Finance program the Consult option is not checked for the Glossary file, the user concerned will not see this file in the Data menu.
Special permissions
Each program offers specific permissions for certain files:
Business
| File | Permission | Notice |
| Addresses | Access to all records | If this box is not checked, the user will only have access to the records for which permission has been explicitly granted via the “i” button at the bottom of the data entry window. |
| Batch and serial numbers | Access to all records | See above |
| Confirmations | Access to all records | See above |
| Creditor credit notes | Access to all records | See above |
| Creditor invoices | Access to all records | See above |
| Creditor orders | Access to all records | See above |
| Creditor payments |
Access to all records EBICS connection |
See above This permission allows a user to manage the pain.001 and pain.002 wire transfer orders to pay suppliers. |
| Debtor credit notes | Access to all records | See above |
| Debtor invoices |
Access to all records Cash registers |
See above If this box is checked, the user may display the dialog for managing a Point of Sales (POS). |
| Debtor orders | Access to all records | See above |
| Debtor payments |
Access to all records EBICS connection |
See above This permission allows a user to import payments made by customers (camt.054 file). |
| Delivery notes | Access to all records | See above |
| Employees | Access to all records | See above |
| Events |
Simplified data entry Own data only |
Displays a simplified event entry dialog box. In addition, the “Mandate Code” and “Service Code” fields are automatically populated based on the default values entered in the employee's record, and the “Invoicing” field is populated based on the service. If this box is checked, the user will only have access to the Event records that they have created themselves. |
| Items-Services | Access to all records | See above |
| Items-Tariffs | Access to all records | See above |
| Mandates |
Access to all records Entry of events |
See above If this box is not checked, the user will be able to link an event to an existing mandate, but will not be able to access the mandate itself. |
| Offers |
Access to all records |
See above |
| Product Bundles | Access to all records | See above |
| Purchases statistics | Access to all records | See above |
| Receptions | Access to all records | See above |
| Sales statistics | Access to all records | See above |
| Spreadsheets | Access to all records | See above |
| Transfer notes | Access to all records | See above |
| Transfer centers | EBICS connection | Allows the user to configure the basic settings so that the software can connect to the bank account. In principle, only the Administrator should have this permission. |
Finance
| File | Permission | Notice |
| Entries |
Lock EBICS connection |
If this box is checked, the user will be able to lock entries. Allows the user to configure the basic settings so that the software can connect to the bank account. In principle, only the Administrator should have this permission. |
| Spreadsheets | Access to all records | If this box is not checked, the user will only have access to the records for which permission has been explicitly granted via the “i” button at the bottom of the data entry window. |
Staff
| File | Permission | Notice |
| Employees |
Career tab |
If this box is checked, the user will be able to access the Career tab in the Employee record. |
| Salaries |
EBICS connection |
This authorization allows a user to manage the transfer orders pain.001 and pain.002 to pay employees' salaries. |
| Transfer centers |
EBICS connection |
Allows the user to configure the basic settings so that the software can connect to the bank account. In principle, only the Administrator should have this permission. |
BiblioMaker
| File | Permission | Notice |
| Addresses |
Display past loans |
If this box is checked, the user will be able to view a reader's borrowing history from the loan management window. |
 Français
 Deutsch
 Italiano