How do I generate and export accounting entries from Business?
With Office Maker Business, you can create invoices and credit notes and manage payments, whether for debtors or creditors. This data can be exported to accounting software such as Office Maker Finance, saving you the hassle of double entry.
For data exchange to work satisfactorily, it is essential that the program has been configured correctly. The following conditions must be met:
- Define a chart of accounts in the Accounts file. This chart of accounts must be exactly the same as the one recorded in your accounting software. If you use Business and Finance, choose the “Office Maker Exchange” export-import format to harmonize the charts of accounts between the two software programs.
- It is also necessary to define account numbers in the records of the following files: Items-Services, Addresses, Payments, Stock Movements, and Preparation for Accounts. You can define default values in the Options for each of these files.
This way, when exporting invoices, credit notes, payments, and stock movements for accounting purposes, the program will be able to create entries for the corresponding accounts.
The exchange of accounting data takes place in three successive stages:
- In the first step, perform the accounting preparation: the program generates the necessary entries.
- In the second step, export the generated entries to a file on your computer's hard drive.
- In the third step, import the file containing the entries into your accounting software.
Let's take a step-by-step look at these different stages.
1. Preparation for accounts
In the Preparation for accounts file, click the Generate Entries button. A dialog box will appear, offering various options.
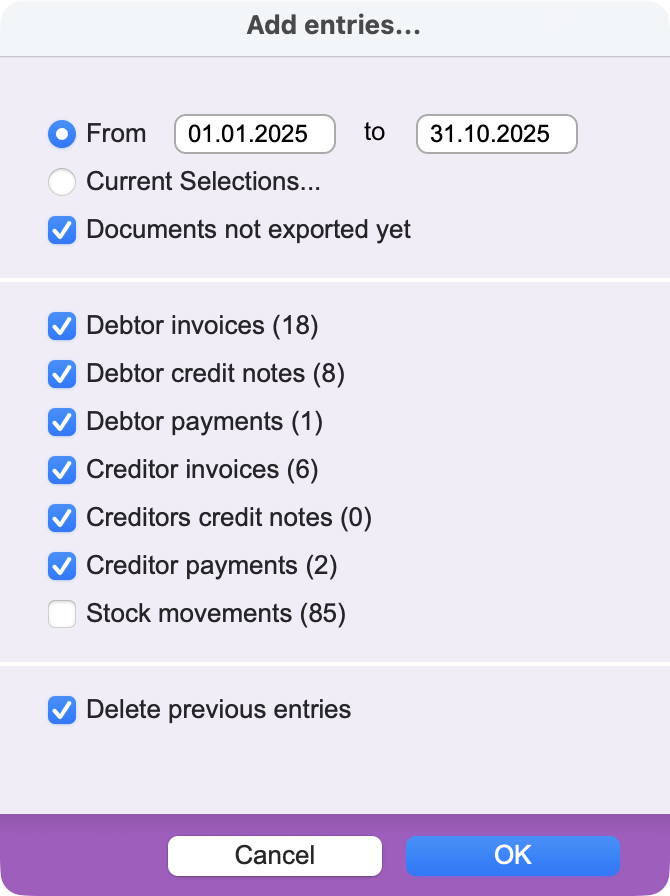 |
We recommend generating entries for documents created between two dates. If you perform a monthly export, leave the start date for each export as January 1 and change the end date to the following month. By default, the box “Documents not exported yet” is checked to avoid generating duplicate entries. Check the boxes for the files for which entries need to be generated. If you have already exported the accounting data, check the box “Delete previous entries”. |
After confirming the dialog box, the program generates the entries and asks you whether the processed documents should be marked as exported. Click Yes to prevent new entries from being generated for documents that have already been exported during the next export.
2. Export entries
In the second step, export the preparation for accounts. Select the Export command from the File menu.
If the export destination is Office Maker Finance, choose the Office Maker Exchange export format. If you have opted for other accounting software, use the Accounting export format described in the knowledge base.
After selecting the export format, click the Options button to set some parameters that will facilitate future exports.
Define the name of the export file and its location on the disk. If necessary, create a specific folder for this operation. Save these settings. This way, each time you export accounting data, the new export file will replace the previous export file, preventing you from importing the wrong file.
3. Import entries
The third step is to import the entries into the accounting software. If you have chosen Office Maker Finance, open the program and, in the Entries file, select the Import command.
After selecting the import format, click on the Options button and specify the location and name of the file to be imported. From now on, when you import data, the program will automatically search for the export file in this location.
If you export entries from multiple software programs, such as Business and Staff, we recommend taking the following precaution: duplicate the import format to specify the path of the file to be imported for each format, one for Business and one for Staff. This will greatly facilitate subsequent imports.
Proceed with the import. Once the import is complete, you will find the entries in the accounting program.
Ensure that the import has not distorted your accounting:
Select the imported entries and call the Action > Linked records > Accounts command to find the related accounts.
In the Addresses file of Business, print the Debtors list and the Creditors list for the end date of the exported period and check the Detailed List box. Compare the total debtors and creditors in each currency with the debtor accounts (usually accounts 1100) and creditor accounts (usually accounts 2000). These totals must match the corresponding accounts in the accounting program.
Thanks to these three simple steps, you save valuable time in keeping your accounts.
The Office Maker Staff software can also export payroll data to your accounting system using the same principle.
 Français
 Deutsch
 Italiano