Importing the CAMT.053 bank statement
More and more Swiss banks are offering the option to export bank statements in the ISO CAMT.053 format, which replaces the older, less detailed MT940 format. Some banks, such as Banque Cantonale Vaudoise, automatically provide a weekly file through their online banking platform, while others, such as PosteFinance, require you to submit a request and specify whether you want a daily, weekly, or monthly file. Thanks to this import format, Office Maker can automatically generate entries for your bank accounts.
It is possible to import from a bank in a foreign currency provided that the bank account is in the same currency. In this case, the counterparties must be in the base currency or in the foreign currency. At least one exchange rate must have been entered for the currency on a date prior to the period to be imported.
After selecting this import format and confirming the import dialog, select the import file downloaded from your bank account on your hard drive.
A window will appear, allowing you to select the bank transactions from the import file to be imported as journal entries.
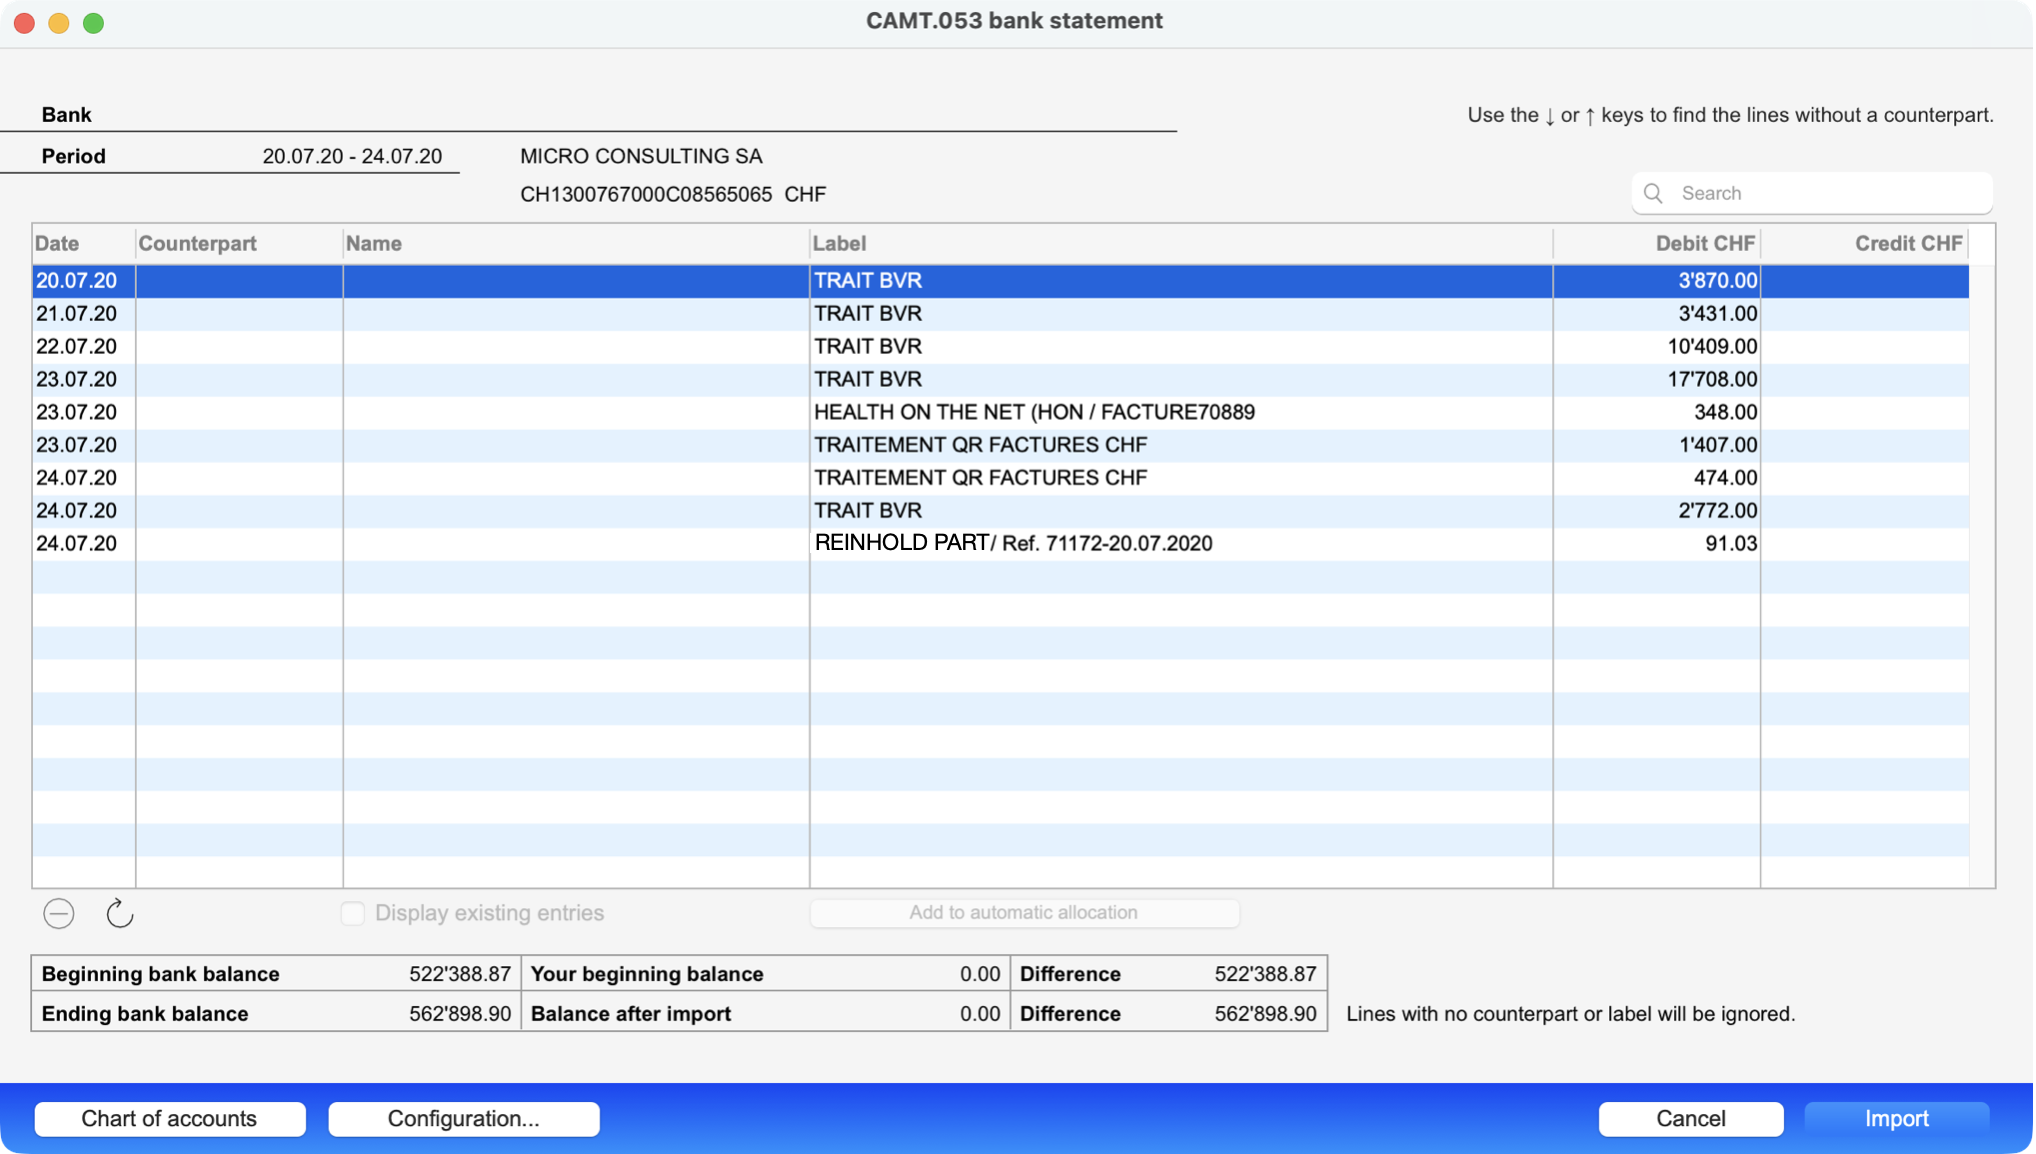
This window contains the following elements :
| Field | Description |
| Bank | Name of the bank from which you are importing the file. This is actually the account name specified in the configuration dialog. |
| Period | Period covered by the bank statement. |
| Table |
Most of the window is taken up by a table listing the transactions in the export file. Each row contains the transaction date, a description, and a debit or credit amount. Each row can also include an account number in the Counterpart column. |
| Beginning bank balance | Account balance at the beginning of the statement period. |
| Ending bank balance | Account balance at the end of the statement period. |
| Your beginning bank balance | Account balance in OM Finance. Ideally, the difference from the Beginning bank balance should be 0. |
| Balance after import |
Account balance after the file is imported. Ideally, the difference from the Ending bank balance should be 0 once you have completed the counterpart entries. |
Your task is therefore to complete the lines to be imported by adding a counterpart. You can also edit the line descriptions. Use the Add to automatic allocation button to automate the processing of certain transactions based on their description.
Note: Only lines containing a counterpart and a description will be imported.
To add a counterparty to a line, click in the cell of the Counterpart column and enter the full name, just the beginning (such as 16 for 1603), or a word from its description preceded by a forward slash (e.g., /sale). You can also view your chart of accounts by clicking the Chart of Accounts button at the bottom left of the window. Keep this window open and select the desired account by double-clicking or using the Select button.
In the top-right corner of the window, use the search box if needed, then the left and right arrow buttons to quickly find specific account transactions based on their date, counterparty, description, or amount.
If you do not want to import certain transactions, select them and click the “–” button at the bottom of the list. Hold down the Alt key while clicking the button to restore the transactions you do not want to import. This is not essential, as lines without a matching entry will be ignored during the import anyway.
If necessary, check the “Display existing entries” box to get a better overview (the “Account No.” field in the configuration dialog must have been filled in).
Configuration dialog
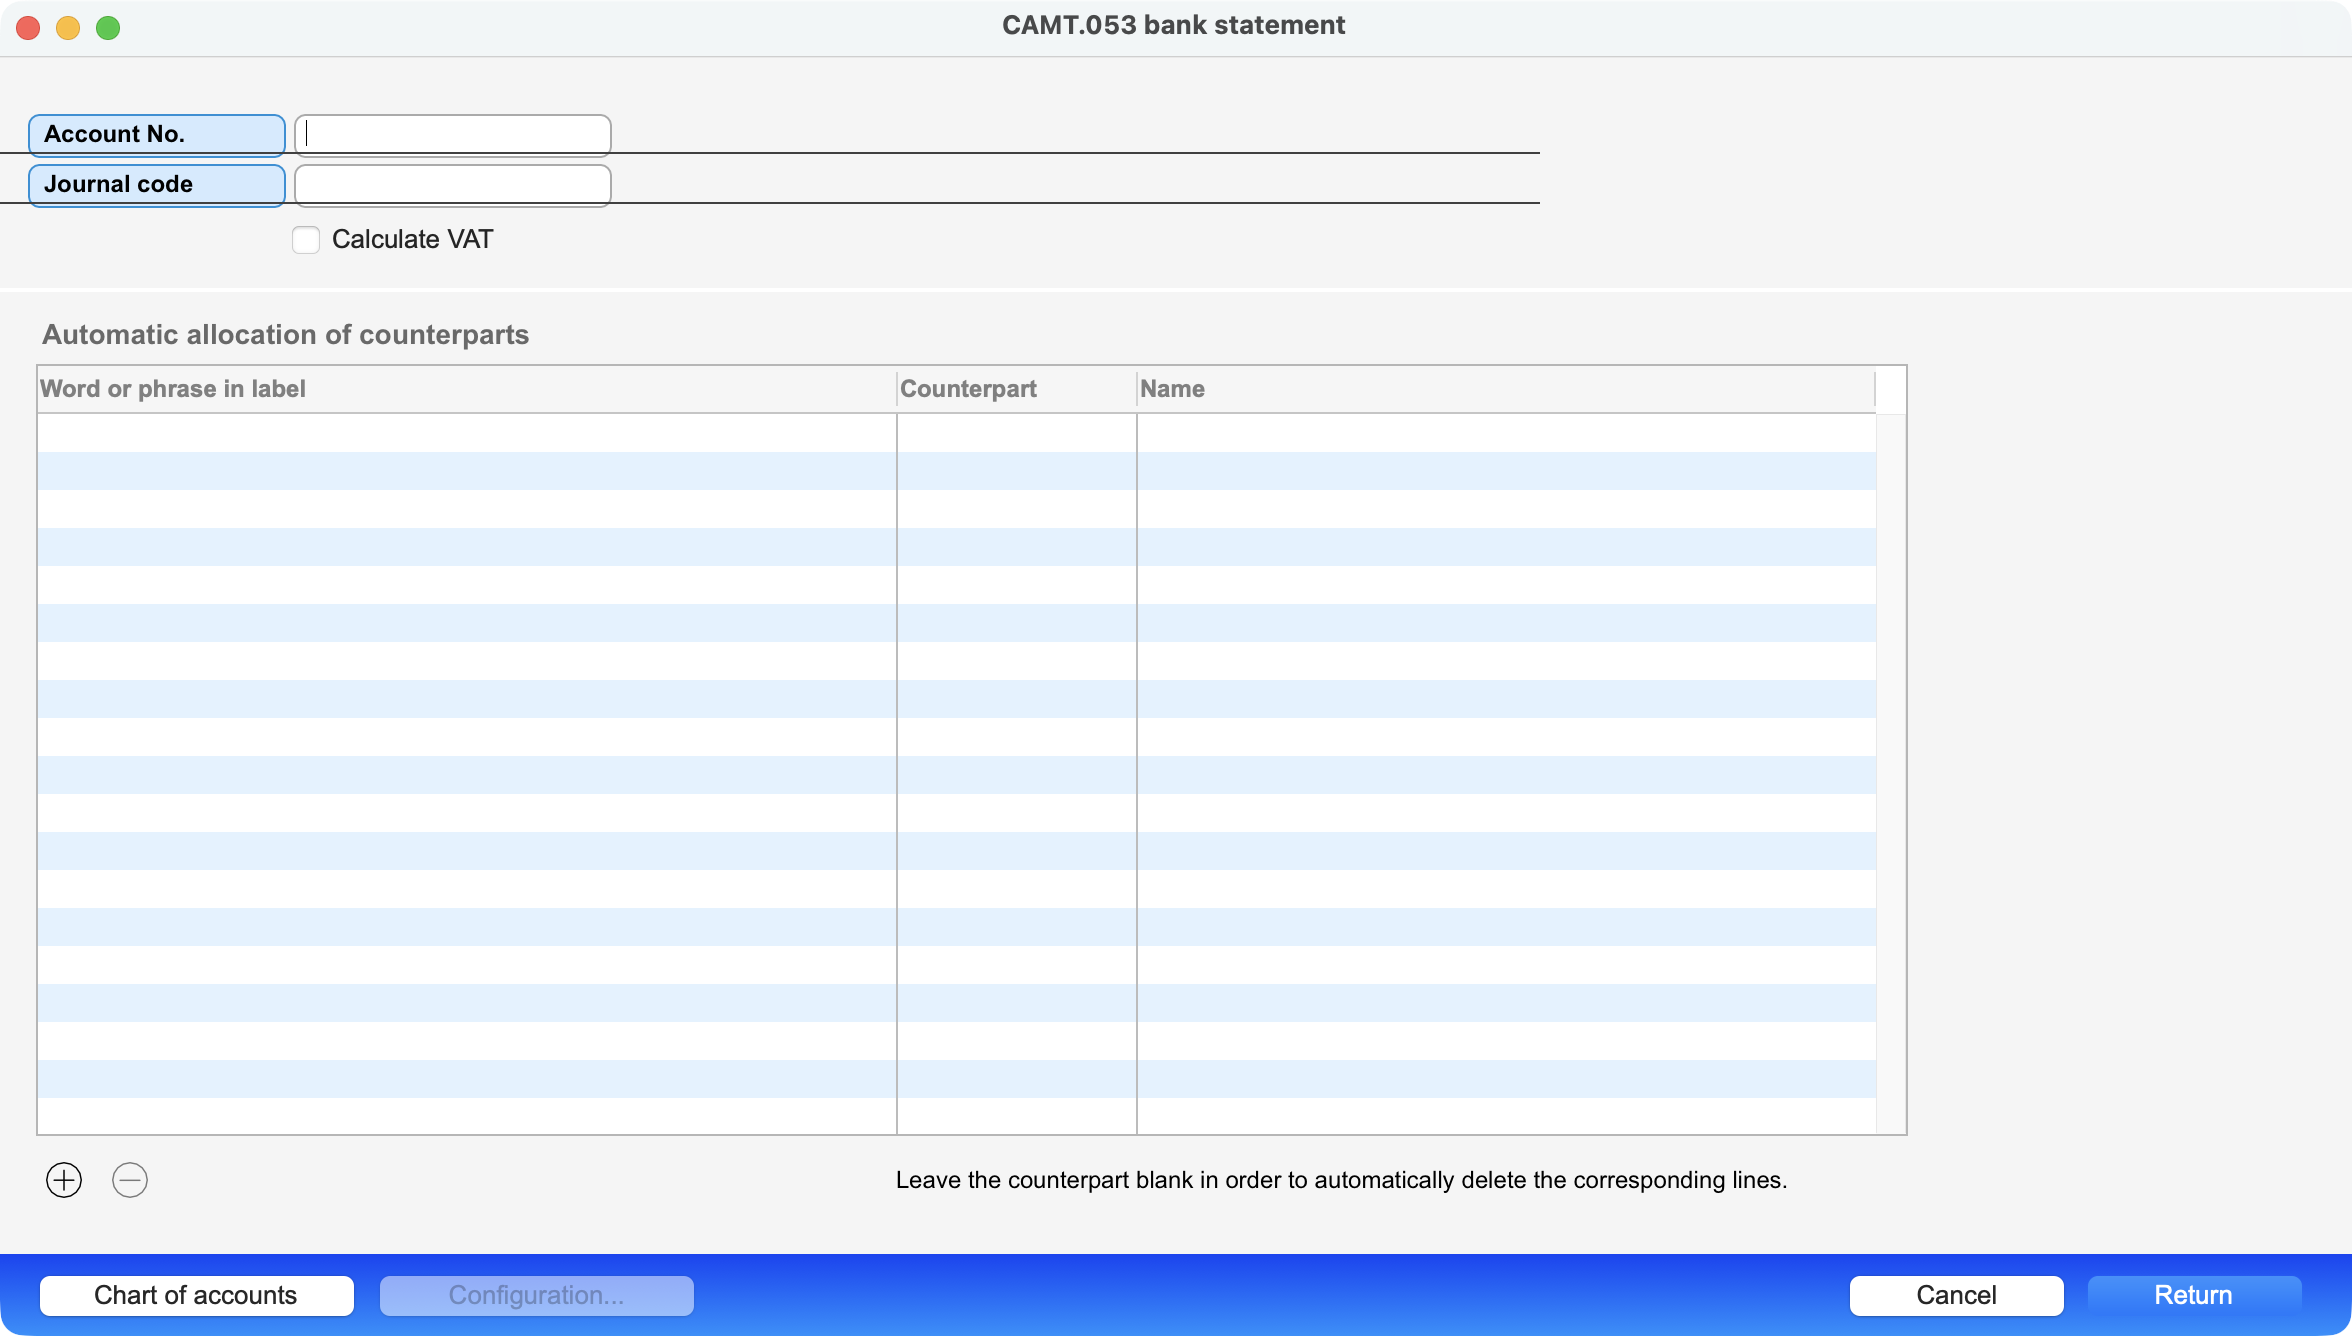
The configuration dialog, accessible via the Configuration button at the bottom of the window, displays the following options:
| Field | Description |
| Account number | Account number to be assigned to the imported entries |
| Journal code | Journal code to be assigned to the imported entries |
| Calculate VAT | Check this box to have the program calculate the sales tax. |
| Automatic allocation of counterparts |
Enter words or phrases in this table; if they are found within the line descriptions, they will automatically assign the defined counterpart to the transactions. If you leave the counterpart field blank, the relevant transactions will be hidden during import. For example, if you define the word “QR” without a counterpart, no transactions containing this abbreviation will be displayed. You can add entries to the list using the “+” button at the bottom of the list or the “Add to automatic allocation” button in the main dialog. Remove entries using the “-” button. These automatic assignments are saved for the next time. You can reapply the automatic assignments to lines that do not yet have a counterpart at any time using the “circular arrow” button. Quickly switch between the journal entries list and the configuration using the Cmd/Ctrl + Right Arrow and Left Arrow keyboard shortcuts. |
Tip : If you want to import transactions from multiple banks, duplicate the import template so that you can set up a separate configuration for each bank.
 Français
 Deutsch
 Italiano