Entering lines in a debtor document
The input window for debtor documents (such as offers, order confirmations, delivery notes, invoices and credit notes) has many similarities. This article describes the input of lines in these documents.
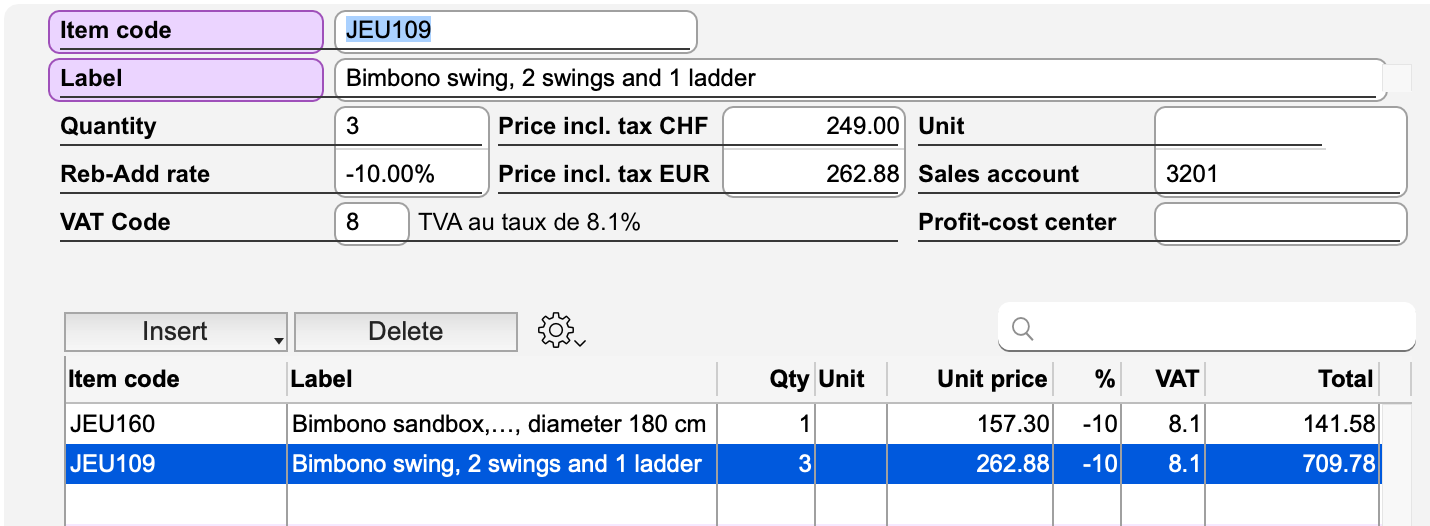
The lines of the document are captured and displayed in the scrolling area. This area is divided into two parts, the lower part being reserved for the summary of the amounts corresponding to the different VAT rates, the global discount lines and the rounding difference. The upper part allows you to enter the data of a new line or to modify an existing line after selecting it. You can scroll these two areas separately using their respective “scrollbars”. The fields that make up these lines are located above the scrolling area. The values displayed are those of the selected line.
Inserting and deleting lines
You can enter as many lines as you need, each line for one Item-Service, the latter being designated by its Item Code. For the first line, just enter the Item Code field. Press the Control N (Windows) or Command N (macOS) key combination (or the Enter key) to create additional lines.
A brief click on the Insert button causes a new line to appear above the selected line, while the Delete button allows the selected line to be deleted.
Line Types
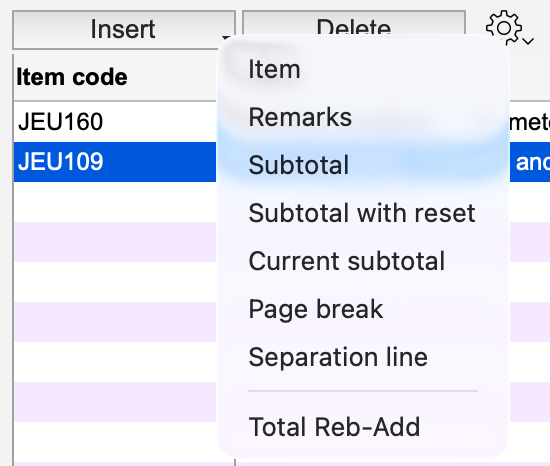 |
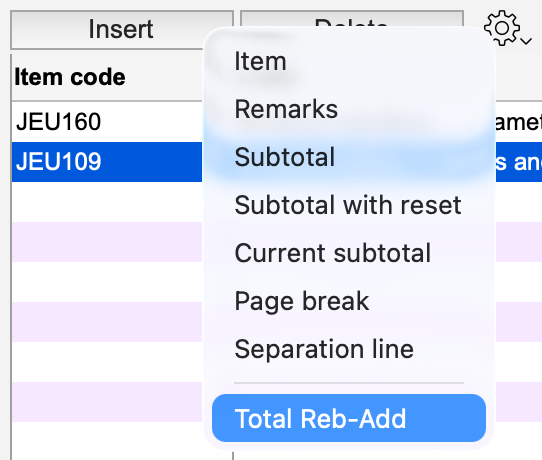
A short click on the first button above the scroll area causes a new line of the type Item to appear. A long click on the same button opens a pop-up menu in which you can choose from different line types. |
Lines of Item Type
Normal article lines. The Delivery Notes file will have some differences.
| Field | Remark |
| Item Code |
Link to the Items-Services file. You can enter the wildcard (@) to display a selection window. You can also display the selection window by clicking on the label “Item code” (on a purple background). When you modify an existing line, clicking on the label “Item code” (on a purple background) displays the Item record for consultation or modification. |
| Label |
Item-Service Label. The label appears as soon as an existing Item code is entered. It can be modified or completed. If you click on the field name (on a purple background), the program displays a larger window to facilitate the entry of long labels. |
| Quantity | Item-Service quantity. By default 1. |
| Reb-Add rate |
Discount (negative value) or surcharge (positive value) rate applied to the line only, regardless of the rate applied to the Total excl. tax (entered below the lines, in the Reb-Add rate or Reb-Add amount fields). |
| VAT Code | Link to the VAT Rates file. The default VAT Code is the one defined in the Items-Services file. It can be modified if necessary. |
| Price XXX |
Unit selling price of the Item-Service, in the base currency (the heading will therefore be Price CHF if the Swiss Franc is the base currency). This price can be modified if necessary. If the item is subject to VAT and VAT is included, the default price is the Price incl. tax of the Item-Service record. If VAT is not included, it is the Price excl. tax of the Item-Service. The unit price proposed by Office Maker Business may differ from the base price recorded in the Item-Service record if it is affected by any conditions defined at the level of discounts/markups and/or tariffs. |
| Price YYY |
Unit selling price of the Item-Service, in the customer’s currency (the item will be labeled Price EUR if the currency is Euros). The program calculates this price based on the exchange rate of the currency. If you change this price, the program will recalculate the price in the base currency accordingly. |
| Unit | Measurement unit applicable to the quantity. This value appears as soon as the Item Code is entered, and can be modified if necessary. |
| Batch / Serial Nr |
Lot number to which the item belongs or item serial number (this field appears only if the “Multistock and Traceability” module is activated). |
| Sales account |
Link to the Accounts file. The default account is the one defined in the Item-Service record. It can be modified if necessary. |
| Profit-Cost center |
Link to the Profit-Cost Centers file. The default center is the one defined in the Item-Service file. It can be changed if necessary. |
| Total | Total of the line. This amount is calculated automatically by the program and is displayed in the last column of the scrolling area. It depends on the other values entered and cannot be changed. |
Lines of Remarks Type
You can use the lines to make simple notes or comments. Just leave the Item Code field blank and enter the desired text in the Label field. Use the Glossary to insert phrases you use often.
You can also leave lines completely blank.
Lines of Subtotal Type
You can use three types of subtotals, which will be automatically calculated by the program:
| Subtotal Type | Remark |
| Subtotal | Simple intermediate subtotal of all lines above. |
| Subtotal with reset |
Displays a subtotal of the values in the rows above. The subtotal counter is then reset to zero. A subsequent subtotal row will not include the values totaled up to that row. |
| Current subtotal | Same effect as a subtotal with reset, except that the overall total of the part will not be printed. This option is mainly for use in quotations. |
Page Break
This line is actually a code that causes a page break when printing.
Separation Line
This line causes a separation line to appear in the line area when printing.
Overall discount (or markup) lines
If the item is set up for a debtor who has a value in the Rebates/Additions field of the Address record, the program will generate a line for the global Rebate/Addition directly. The discount (or increase) rate will be entered there. You can modify it, or modify the Discount (or Increase) Amount. You can also specify the Label for this line (for example, “Special End-of-Series Discount”).
Discounts are always calculated on the prices excluding tax.
|
The local menu at the top of the line area allows you to create a Discount or Global markup line yourself. You can also create several of them, and reposition them in relation to each other by dragging them with the mouse. Each discount (or markup) line is calculated on the previous subtotal. Discount (or markup) lines always precede the VAT line(s) and the possible rounding difference line. |
 |
Rounding difference line
Most often, debtor documents are set in a currency for which rounding has been specified. In the item lines, Office Maker calculates the values in the Total column to the nearest cent. The rounding of the currency (most often to 5 cents for the Swiss franc) is then applied to the Total including tax. This may result in a difference with the total of the line amounts, taking into account the possibility of entering fractional quantities, the possible application of a line discount, the various global discounts (or surcharges) and/or VAT.
If there is a rounding difference, the program generates a line that appears last in the lower area of the lines of the item, and whose value is automatically calculated as you enter the data.
The rounding of each Currency can be specified in the Currency’s record.
In the Preparation for Account Options, you must specify an Account No. that will receive these rounding differences.
In the debtor Documents Print Options, you can decide whether or not to print the rounding difference line.
Sorting and moving lines
Lines can be sorted by clicking on the column headers. They can also be moved by dragging them with the mouse. You have complete freedom to arrange the lines in the order you want.
If you have inserted subtotals, page breaks or separator lines, sorting will cause these lines to be grouped by type. You will then have to reposition them manually.
Surfaces and volumes
When you add an Item-Service line, the program by default proposes the value 1 in the Quantity field. However, if the Item-Service description contains two numerical values in parentheses separated by the “x” sign (preceded and followed by a space), these values are multiplied and the result is proposed by default in the Quantity field. For example, with the description “Granite slab (2m x 3m),” the program will propose a value of 6 in the Quantity field.
Thus, if you have many items of this type that differ only in their size, you will only have to indicate the price per square meter for each of them in the Price excl. tax and Price incl. tax fields. You can also create only one item and modify the values in the item itself.
The same applies to volumes. With the label: “Cement pillar (0.5m x 0.5m x 3m),” the program will propose 0.75 in the Quantity field.
In the long label entry dialog (displayed via the Label button), specific fields are displayed for entering the values of the formula.
This mechanism can be activated or deactivated in the Options of the Items-Services file, in the Other options tab.
It is also possible to enter the text […?] in the label of an article. When this article is called up in a document (offer, confirmation, invoice, credit note), the long label entry dialog is displayed and you can replace the content between the square brackets with the desired value. When the dialog is validated, the square brackets are automatically removed.
 Français
 Deutsch
 Italiano