Entering a debtor document
The entry of records in the various files accessible in the Sales menu (offers, confirmations, delivery notes, invoices and credit notes) has many similarities. This article lists the various common elements displayed in the entry window. The elements not mentioned here are specific to a particular file.
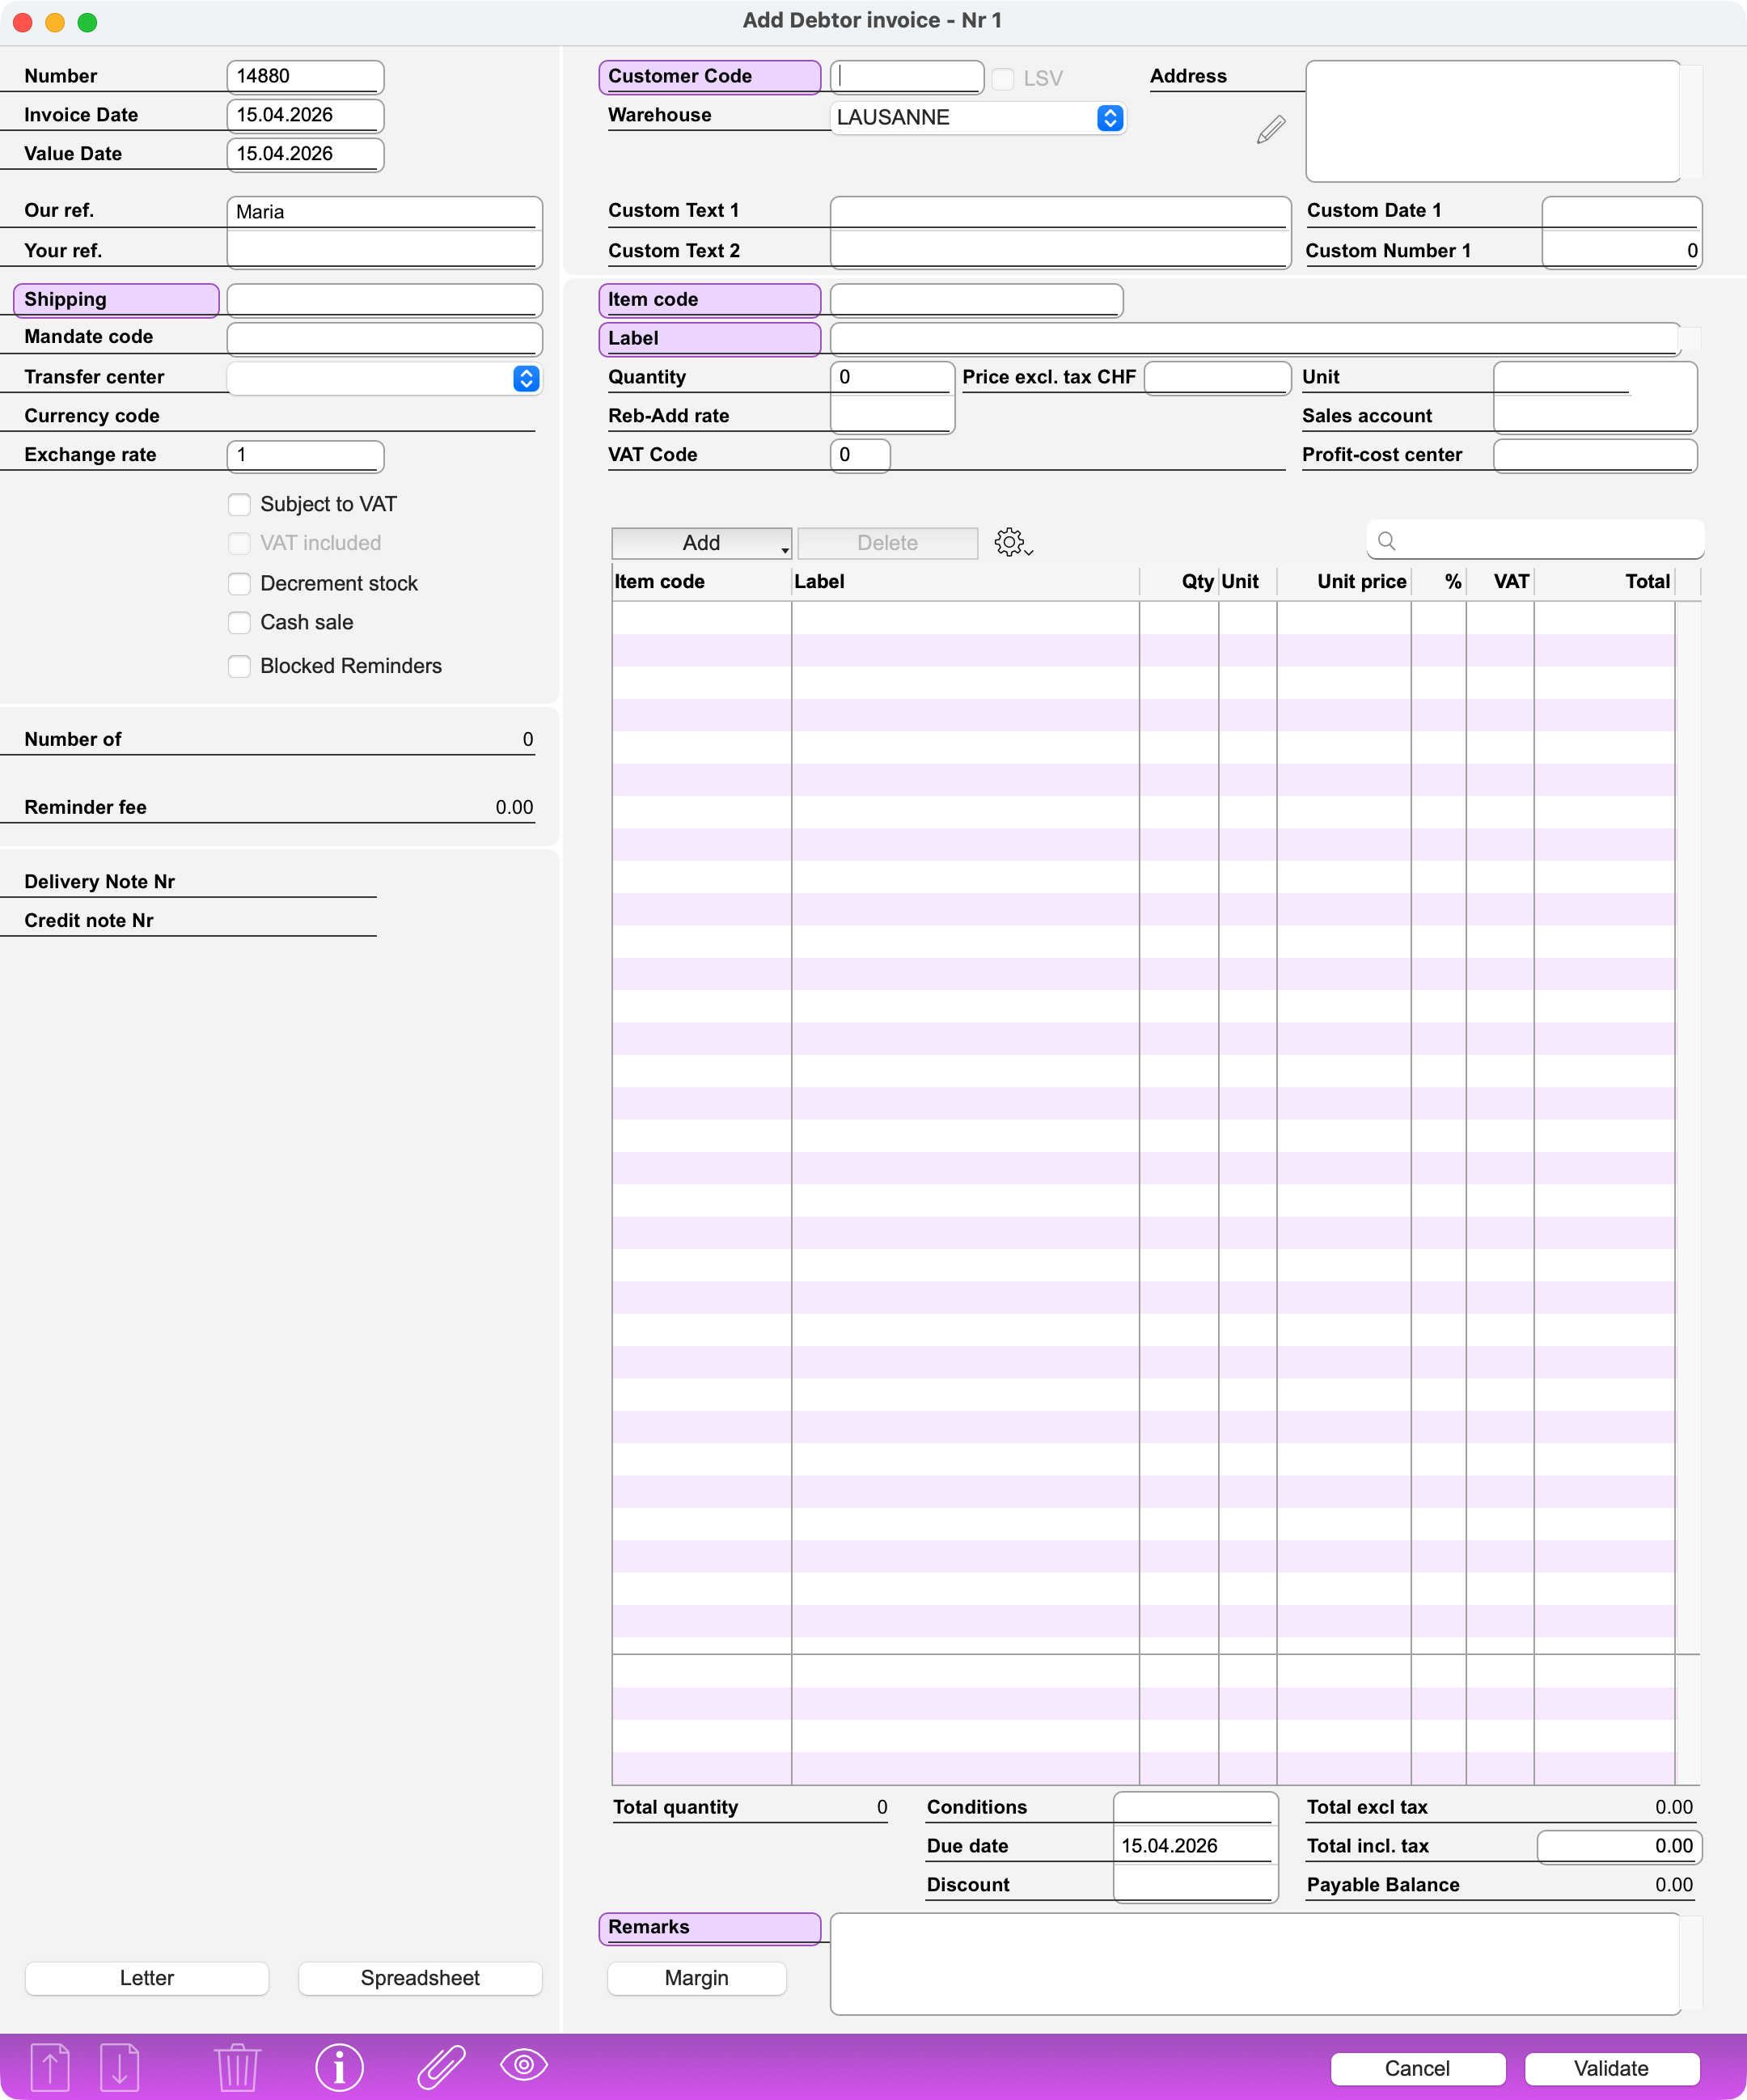 L'écran de saisie d'une facture
Tab order
When you go to the next field using the Tab key, the insertion point does not necessarily move from left to right or from top to bottom. The tab order is the one that is most convenient or that provides the quickest access to the information you will most often need to enter.
For example, when you create a new record, the insertion point is by default in the Date field. If the current date, which is always proposed by default, is acceptable, the insertion point will be in the Customer Code field if you press the Tab key twice.
If you press Shift+Tab (from the Date field), the insertion point will return to the Mandate Code field (if the corresponding module is installed). This can make it easier to enter the other data, since the mandate can call the correct Customer Code if the latter is locked using the Locked Address field of the Mandate record.
Number field
Link field. The Number of these documents must be a numerical value. When you create a new record, its Number is automatically generated by the program but can still be modified. You can intervene on the automatic numbering through the Options. Once the record has been validated, the Number can no longer be modified.
Date field
The current date is always proposed by default in the Date field. As the content of the section is selected, you only need to type another date if you want to change it. In all date-type sections, if you only type the day, the program will complete it with the current month and year. If you type the day and the month, the program will complete it with the current year.
Your/Our Reference field
Fields for entering the initials or full name of the persons concerned by the document.
Mandate Code field
Link to the Mandates file (if the Mandates module is installed). The Mandate Code can be used to facilitate the entry of other data, as the mandate can call the correct Customer Code if the latter is locked using the Locked Address field in the Mandate file. When you create a new file, with the insertion point in the Date field, press the Shift Tab key combination to move the insertion point to this field. You can enter the wildcard (@) to display a selection window.
Currency Code field
The Code and the Name of the currency appear as soon as the link with the Address record is established, i.e. as soon as the Customer Code has been entered and recognized. It is not possible to change this. In the lines of the document, as well as at the bottom of the page, the values displayed are in this currency. In the input fields, the amounts can be indicated in the base currency or in the currency of the document.
Currency Rate field
The current Currency exchange rate is also displayed as soon as the link to the Address record is established, i.e. as soon as the Customer Code has been entered and recognized. It can be adjusted if necessary.
Subject to VAT field
If the customer is not subject to VAT (e.g. a foreign customer), this option should not be checked. The program will then use the Prices excl. tax from the Items-Services file and will not calculate VAT.
VAT Included field
If the customer is subject to VAT and the VAT included checkbox is checked, the Unit price of a Service-Item will be the Price incl. tax recorded in its record, which is supposed to include the amount of VAT. If the VAT included checkbox is not checked, the unit price will be the Price excl. tax of the Item-Service record. The program will then add the amount of VAT by calculating it based on the VAT Code of the Item.
Customer Code field
Link to the Address file.
When you create a new record, with the insertion point in the Date field, press the Tab key twice to move the insertion point to this field. You can enter the wildcard character (@) to display a selection window. Alternatively, you can display the selection window by clicking on the Customer Code label (on a purple background).
When you edit an existing record, clicking on the Customer Code label (on a purple background) displays the Address record for viewing or editing.
Warehouse field
If the “Multistock and Traceability” module is activated, select in this menu the storage location of the items mentioned in the document.
Address block
The Address block appears as soon as the link to the Address record is established, i.e. as soon as the Customer Code has been entered and recognized. The address block can be freely edited. This editing will only affect the current document being edited and not the Address record itself. If you click on the Address label (on a purple background), a window will appear to allow you to select one of the secondary addresses that may have been recorded in the Address record referenced by the Customer Code indicated.
Custom fields
You have four custom fields of the types Text, Date and Number. You can assign a name to the custom fields in the File Options.
If the custom fields have the same name in the different debtor files, their content is automatically copied into the documents created on the basis of an existing document. If, for example, you have renamed the custom text field 2 to “Representative” in the Quotations, as well as in the Delivery Notes (or the Invoices), its content will be copied into the Delivery Note (or the Invoice) that you create on the basis of this Quotation.
However, this only works if you convert only one document. If you ask to combine the data of several delivery notes into a single invoice, the data of the custom fields will be ignored, because it is possible that they are not identical on the different converted delivery notes.
Entering lines
Please read this article.
Conditions field
Payment terms (in days). In the Invoices file, this value determines the Due date. If you change the Due date, the program will recalculate the Conditions accordingly.
Discount field
Discount terms offered. You can include this information for reference purposes. It does not affect the calculation of the document fields, but will be taken into account when payments are recorded.
Total excl. tax field
This amount is the sum of the line totals, taking into account any Reb/maj rate, but does not include VAT.
Total incl. tax
Total amount of the document, including VAT where applicable, and taking into account the various discounts and surcharges applied. This amount may be modified (e.g. rounded up or down); in this case, the Reb/Add. amount and Reb/Add. rate fields are recalculated accordingly.
Remark field
Long text field. The text entered in this field will be printed on the document you will send to the customer.
Letter button
This button gives access to the built-in word processing module. The created letter remains saved and associated with the document, and will be printed at the same time.
Spreadsheet button
This button gives access to the integrated spreadsheet module. The created spreadsheet remains saved and associated with the document.
Margin button
You can find out the profit margin by clicking on this button. It can be calculated either in relation to the Average Cost Price or the Current Cost Price.
Preview during entering data
Please read this article .
 Français
 Deutsch
 Italiano