Creating an account entry: the Entry menu
 |
During entry, an additional menu, the Entry menu, is displayed in the menu bar. All the commands in this menu can also be selected using the button below the scroll area for entry lines. |
Insert / Delete line
To create a new entry line, select the Insert line command from the Entry menu. The new line appears before the selected entry line, if there is one, while pressing Enter creates a new line after the existing ones.
The Delete line command is of course used to delete a line.
Display Chart of accounts
You can select the Chart of accounts command from the Entry menu. The chart of accounts is then presented to you in a separate window (this window can remain permanently open on your screen); in this window, the list of accounts can be sorted by Account no. or by title by clicking on the corresponding label. The chosen sorting criterion appears underlined.
To quickly select an account, you can type the first few digits of the Account number or the first few characters of the account name, depending on the sorting criterion you've chosen. Once you've activated the desired account, click on the Select button or press Return or Enter. Alternatively, double-click directly on the desired line. The selected account will then be inserted in the entry line currently being entered.
To quickly create multiple entry lines with different accounts, press the Alt (Option) key and double-click on each of the accounts to be added.
Display Account statement
The Entry menu can also be used to display an account statement in a resizable window, without having to abandon the entry being entered. By default, the program displays the account statement of the entry line currently being entered.
Several account statement windows can be opened simultaneously by selecting the command several times. In addition, it is possible to continue working in the entry windows while leaving the account statement windows open.
Entry log
This command displays the work session summary in a separate window.
Balance line
The Balance Line command is only active when a line (other than a calculated VAT line) is selected in a modifiable, unbalanced entry. In the illustration below, the entry is unbalanced, following, for example, the correction of one of the amounts entered in the Credit column:
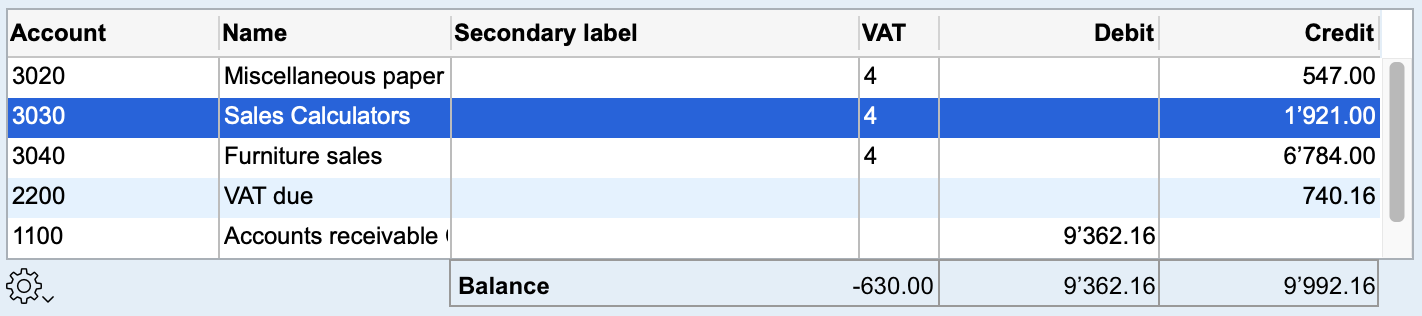
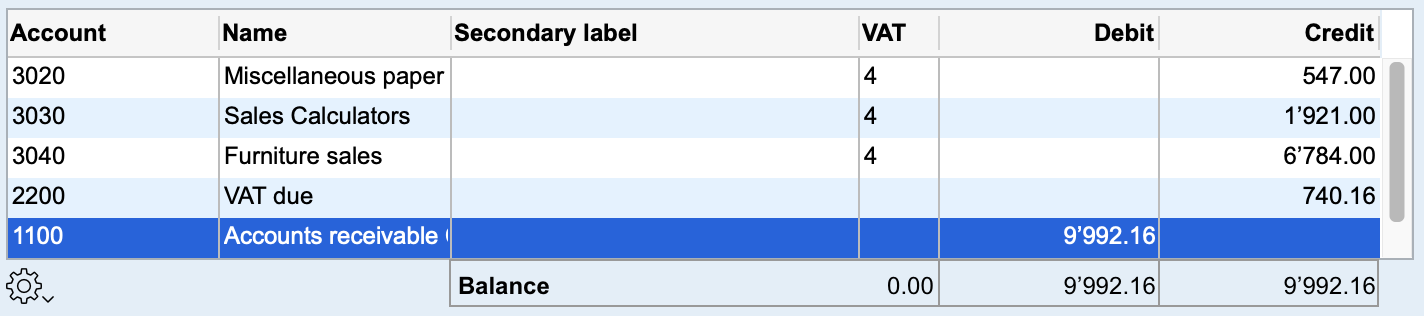
Simply select the counterpart (Account 1100) and choose the Balance Line command. The amount of this line is then automatically modified to balance the entry:
VAT Report
The four annual entries corresponding to the four quarterly VAT statements have the effect of reducing the VAT provision to be reclaimed (Accounts no. 1170 and 1171 in a standard chart of accounts). If these entries are taken into account when the VAT statement is printed, this causes an error in the calculation of the amount of VAT to be reclaimed. In fact, the program simply calculates the variation in the balance of these accounts over the period of the statement.
It is therefore necessary to mark entries corresponding to VAT statements, by selecting the VAT report command in the Entry menu. Entries marked in this way will then be ignored in the VAT statement. When you select this option, a warning message appears to remind you of its usefulness.
Only the four annual entries corresponding to VAT settlements should be marked as VAT settlements. If you have selected this option when the entry is not a reduction in the VAT provision, select it again so that it no longer appears ticked in the Entry menu.
When printing the VAT statement, if no entry marked VAT statement is found for the period, the program displays the following alert:
Caution: the entry of the previous VAT report was not found over the period. Please ensure you have marked the entries corresponding to the 4 annual reports using the option VAT Report in the Entry or Cogwheel menu. The amounts of recoverable VAT could otherwise be erroneous.
 Français
 Deutsch
 Italiano