Reports Editor : examples of how to create a list
This article describes the step-by-step creation of two customized lists using the Reports Editor. The first example is a simple list, i.e. a table containing a few columns. The second example illustrates the creation of a table of columns containing calculations.
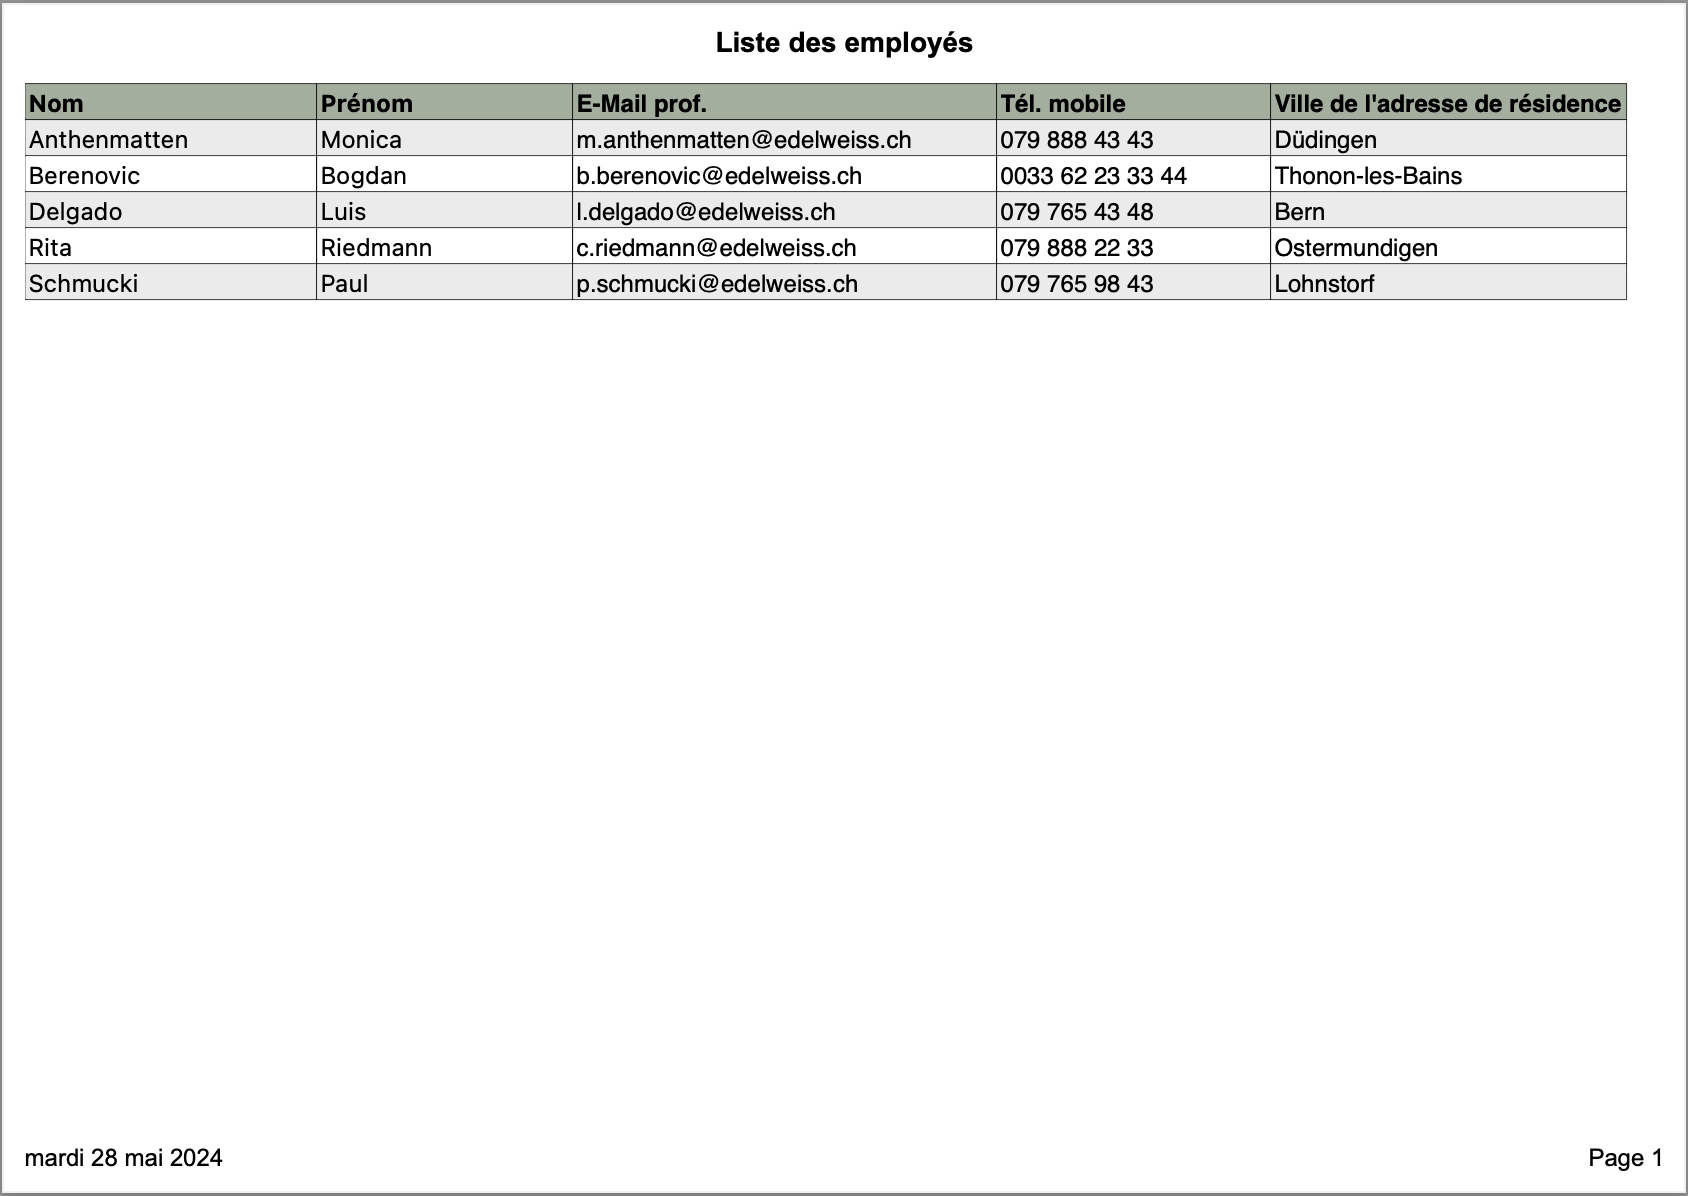
Example 1 : Simple list
List properties
In this example, in the Staff program we will create an employee list containing the following columns:
Last Name - First Name - E-mail Address - Cell phone number - Location of main residence
The list must be sorted by surname and first name.
A header contains the list title.
A footer contains the date the list was generated and the page number.
Records selection and access to the report editor
Before creating the list, you need to select the records that will serve as examples for the list preview. Limit yourself to a selection of around twenty records, so that the preview generation doesn't take too long.
In the Employees file of Staff, select around twenty employees.
Call up the File>Print or File>Export command, depending on the desired destination of the report. Click on the Create button, then choose Report, then Employees basic file.
Select fields and define sort order
In the area at the bottom of the screen containing the fields to choose from, drag the Last Name then the First Name fields to the Sorting Order area. Both the report area and the Sorting Order area contain these two fields.
In the fields area, double-click on the Prof. E-Mail, Mobile Phone and City home fields of the home address. These fields are added as columns in the report area.
Paper orientation
If the report destination is a printed list, a red vertical line will probably be superimposed on one of the report columns. To prevent data from disappearing into the right-hand margin of the report, change the paper orientation: select File>Print setup from the menu and choose Landscape orientation. After confirming the dialog, the route line has been moved to the right.
Column layout and Preview
Note: if the final document is to be exported to a text file, there is no need to define column formatting.
You can change the width of each column by dragging its border in the column header area. Use the preview function (eye icon at the bottom of the Report Editor or File>Preview command) to get an idea of the ideal size for each column.
If you want certain rows or columns to have a particular font style (font, size, style, color, justification, etc.), select them and, with a secondary click, choose the desired attributes from the contextual menu.
Header and footer
If the report destination is a printed list, call up the File>Header and Footer command to define the header and footer. In the Center field of the header, enter the desired title (use a generic title if you wish to reuse this report later). In the Left and Right footer areas, use the cogwheel icon to insert codes that will be replaced by the current date and page number. In the Options tab, specify the height of the header or footer and the character style to be used. You can also insert an image, such as a logo.
Validate the header and footer with the √ button.
Borders
If the report destination is a printed list, by default the column table and each column are surrounded by borders. If you don't want them, uncheck the checkboxes in the Borders group.
Save the report
If you are satisfied with the preview, validate the report and give it a name. This will be displayed in the print/export dialog, and you will be able to reuse this report with a different content each time, depending on the records selected before the report was generated.
Example 2 : List with calculation
List properties
In this example, in the Business program we'll create a statistical list providing the number of addresses per canton. The end result will look like this:
| Canton | Number of addresses |
| GE | 25 |
| VD | 14 |
| VS | 10 |
| Total | 49 |
Records selection and access to the report editor
Before creating the list, you need to select the records that will serve as examples for the list preview.
In the Addresses file of Business, select a few address records from different cantons.
Call up the File>Print or File>Export command, depending on the desired destination of the report. Click on the Create button, then select Report and the Addresses basic file.
Select fields and define sort order
In the bottom area of the screen containing the fields to choose from, drag the Canton field to the Sorting Order area. Both the report area and the Sorting Order area now contain this field.
In the fields area, double-click on the Code field. This field is added as a column in the report area.
Rename columns
Columns can be renamed as required. In this example, we're going to change the wording of the Code column: double-click in the cell crossing the Title row and the [Addresses]Code column. Then enter the label Number of addresses, which will replace the label Code.
Hide the Format row
We don't want to display all address records, but only a number of records per canton. Therefore, we need to hide the Format row, which contains the details of the records. Secondary-click on the Format row label and select the Hide this row command from the contextual menu. The Format row is grayed out to indicate that it will not appear in the report.
Summary by canton
To obtain the list of cantons, the cell intersecting the [Addresses]Canton changed row and the Canton column must contain the # character. The program will replace this character with the name of the canton.
Double-click in the cell intersecting the row [Addresses]Canton changed and the column [Addresses]Canton. Then enter the # character.
Grand Total
In the cell intersecting the Grand Total row and the [Addresses]Canton column, we'll enter the Total label.
Double-click in the cell intersecting the Grand Total row and the [Addresses]Canton column. Then enter the text Total.
Calculation formulas
In the cell intersecting the row [Addresses]Canton changed and the column [Addresses]Code, we'd like to obtain the number of address records for each canton.
Secondary-click in this cell and select the Count command from the context menu. N Number appears in the cell.
In the cell intersecting the row Grand Total and the column [Addresses]Code, we'd like to obtain the number of address records for each canton.
Secondary-click in this cell and select the Count command from the context menu. N Number appears in the cell.
This is what the report area looks like at this stage:
| [Addresses]Canton | [Addresses]Code | |
| Title | ||
| Format | ||
| [Addresses]Canton changed | # | N Count |
| Grand Total | Total | N Count |
Other settings
If you'd like to define other settings (paper orientation, column formatting, header and footer, borders), please see the first example in this article.
Save the report
If you are satisfied with the preview, validate the report and give it a name. This will be displayed in the print/export dialog, and you will be able to reuse this report with a different content each time, depending on the records selected before the report was generated.
 Français
 Deutsch
 Italiano